

4 Ways to Remove Your Splitboard Skins
Here’s a quick article covering the main ways that backcountry skiers and splitboarders remove their skins.
Going into the backcountry with an idea of how to manage your gear is recommended. Removing your skins and having them prepared for the next climb is handy. It makes your transitions smoother and helps to make the whole backcountry experience much more pleasant.
We are going to cover a technique for windy days, one for those folks that may not be that tall, the method I have been using since I started, and the classic from standing.
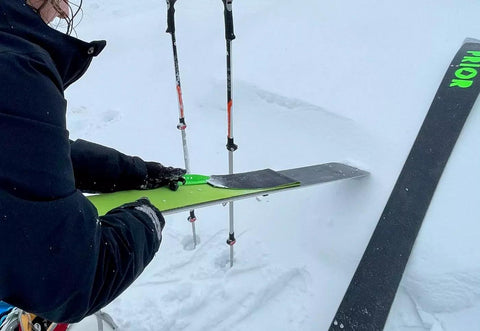
The Fold Over

This technique is amazing on windy days. Individuals who use this technique also compliment on how much control they have when they are matching their glue sides together.
Start by planting the tip of your ski away from you. Unhook the tail clip. Pick the ski up, flip it and remove the ski halfway. Now plant the tail in the snow. The tricky part is you are going to do this with one hand, while the other hand manages to hang onto the skin.
While holding the skin away from the make a pinch fold at the center of the skin.
Using the pinched fold in the skin, begin to pull the remainder of the skin off. As you are pulling the skin off, continue to match the first half’s glue side to the second half.
Key point

The pinched center fold needs to be lined up correctly. This might take some practice to master.
Downfall
This technique will require a decent arm reach to achieve.
The skins are halved with the glue sides together. On colder days skins can be difficult to pull apart like this.
The Shorty
If you are finding that it feels like your arms aren’t long enough to manage the full length of your ski, this technique may work for you.
This technique I refer to as the shorty because it starts with folding in the first half of the skin on itself.
Start by planting the tip of your ski away from you. Unhook the tail clip. Remove the first third off the skin from the ski.
Line up your flat edges of your skin and fold the first half over on itself. Now plant the tail in the snow. Remove the remaining half of the skin and fold it over on itself like the first half. You have two shorter sections to pull apart when putting your skins back on.
Key Point

The final fold should place the two shorter half together with the middle point of the skin facing inwards.
Downfall
There is more potential for dirt and debris to get on the skins due to the multiple folds and exposed bit of glue.
The Bandaid

Let it rip!
This technique is quick and fairly easy, though developing the exact coordination for it might take a few attempts. In one motion the entire skin is going to come off the ski. So be prepared to have a long sticky skin freely dangling around.
Start by planting the tip of your ski away from you. Unhook the tail clip. Next grab the tail clip with one hand and the tip of the ski with the other.

( It would be beneficial to practice the throw on flat ground to make sure the ski will plant into the snow. An unpleasant event can happen that the ski will head down hill without a skin, because it didn’t plant well)
From the tip of the ski, throw/plant the tail of the ski into the snow. At the same time rip the skin completely off the ski. Fold in half while matching the edges of the skin as best you can together.
Key Point
Throwing or planting the ski down slope can help to achieve the extra reach that is needed with this technique. Also note that due to the reach needed for this technique give yourself space from your friends around you.
Downfall
The exposed glue can accidentally stick to you and on extremely windy days it is next to impossible to catch the tip end of skin once it is flapping in the wind.
From Standing
Please never ask me to attempt this. This technique for splitboarders is great on long traverses when being able to gently split-ski for short distances is needed. For skiers wanting to crush laps ripping your skis off standing up and putting them in your jacket equals access to faster laps.
Find yourself some room to pull your skin off, as well as some room in case you fall. Begin by stabilizing yourself using both your poles on the opposite side you plan to remove. Lift your leg and grab the tail of the ski, unclip the tail clip. In one continuous sweep, pull the skin off toward the tip of the ski. Again with this technique line up the skins and fold in half.
Key Point
This is a great technique for skiers
Downfall
Literally downfalls, take practice and definite moments of humiliation to master.
Also takes flexibility and balance.
How to Remove Your Splitboard Skins Summary

Removing your skins is just another fun skill to learn while you are out in the backcountry. Knowing a few different methods can be helpful depending on the wind and the weather.
You definitely don’t have to follow these techniques perfectly, adapt and play with them a bit to find out what works best for you.
Related Splitboarding Articles
Beginner Splitboard Skinning Tips
Tips for Smooth Splitboard Transitions
Splitboard HQ Contact
Edmonton: (p) 780 463-4892 (e) info@splitboardhq.com
Calgary: (p) 403 288-9283 (e) info@splitboardhq.com